Showing posts with label Photography Techniques. Show all posts

Friday, February 12, 2010

High ISO Shooting

First of all – Apologies for not writing for almost 2 months. As most of you know, I am now in India and the move was extremely hectic and overwhelming! I am now settled though, and hope to continue my blog as before!

So, coming to this blog. Lets first understand why HIGH ISO is even a topic and what ISO and high ISOs are.

As many of you would have noticed something labeled as ISO on your cameras. But most people I know have hardly used this feature because they either don’t know how to use it or don’t know what it means or both.

In simple terms – ISO is defined a film or the image sensor speed. It defines how fast or slow the film or image sensor is. In other words it is simply a measure of sensitivity of the film or the image sensor to light. So higher the ISO, greater is the sensitivity of the film or image sensor - which is what is called fast film or sensor. If the ISO is low then its the slow film or image sensor which is to say its less sensitive to light.

If you own a digital camera, then ISO speed are marked as 100, 200, 400, 800, 1600, 3200 and so on…

I will not touch upon the how the ISO affects the exposure stops as its much more involved subject. For the time being its enough for you to understand that the following

  • A low ISO say 100 or 200 will make your image sensor less sensitive to light. So you will need more exposure time to shoot a scene. Slower shutter speed.
  • A high ISO of say 800 or 1600 will make the image sensor more sensitive light. So you will need less exposure time to shoot the same scene. Faster shutter speed.
  • To be exact – every doubling of ISO speed, you double the sensitivity of the film or sensor. So you will need a faster shutter speeds as you increase the ISO (assuming your aperture or f-number is constant) to get the correct exposure.

So, when do you need high ISO? – In most daylight situations, an ISO of 100, 200 or 400 should be enough. But things change when you have following scenarios and that is when you need higher ISO

  • You cannot use or do not have a flash and you are shooting indoors under natural or artificial light
  • You want to use fast shutter speed to freeze an action.
  • You are in an aquarium or a museum. Now you may say you can use flash. But you will get horrible pics if you choose to use external flash in aquarium unless you do a professional setup. So I would rather go with high ISO to get faster shutter so that I reduce shake
  • Remember – as a general rule you should have the shutter speed which is at least reciprocal of the highest focal length of the lens. So if you lens is 50mm then you should have the minimum shutter of 1/50 so that you don’t get into camera shake effect. So increasing ISO in such a situation to get optimum shutter speed is desirable.

Now having said this, if you are shooting in a lowlight without tripod then you better have a very good reason for doing so. But like we all know, its not practical to have tripod every where you go, even if you have it, its not practical to set it up everywhere. High ISO will come to the rescue for you.

Those were the advantages and ways to use high ISO, of course as with everything else in life, all good things come with a price. So does high ISO.

A high ISO makes the image sensor very sensitive to light, which in turn introduces digital noise in the picture. As seen from the picture below, use of ISO-2000 has allowed me to use a shutter of 1/500 inside a mall. However it has lots of tiny specs. This is noise.

_1261298  

However there is way to get rid of digital noise during post processing. I use a software called Noiseware.

The corrected image in Photoshop and using Noiseware to reduce noise.

In the spirit!!

But such software have their limitations. They work best when your exposure is spot-on. If your picture is under exposed, then you are in trouble. The noise reduction software will do more harm then good.

This is because any image sensor/processor has a higher latitude for over exposure in low light than under exposure. So if you over expose your pic then you may be able salvage it even if it has lot of noise. But if you under expose, then you are definitely in trouble.

I will show you an example. Here are 2 pictures.

Both are shot @ ISO 3200. The first picture is terribly under exposed. So it had a lot of noise and even with a lot of post processing in Photoshop, I couldn't get the exposure right nor was the Noiseware able to remove the noise properly. The result – bad picture, terribly underexposed, no clarity what-so-ever, bad noise. You can see the noise even after processing with Noiseware.

Second picture was over exposed by 2 stops. I could salvage this picture in Photoshop and get almost correct exposure. I could also remove almost all noise and picture is perfectly clear. Although you do see some camera shake in it, that's because of slow shutter as a result of over exposure. Also there is some loss of details in the bright areas, but who cares….I got the subjects nice!

OLYMPUS DIGITAL CAMERAOLYMPUS DIGITAL CAMERA 

So, if you want to shoot in low light with high ISO, always remember to ensure your exposure is right. One way of ensuring this is to use SPOT metering on the subject and adjusting the EV (Exposure value) to get the appropriate exposure.

Remember over exposure is better than under exposure any day when shooting in lowlight.

Some High ISO examples

ISO-3200

OLYMPUS DIGITAL CAMERA


ISO-2000

This is India - A balloon seller inside the mall! 


ISO-1600 for 1/8000 sec to freeze the bird. Broad daylight.

OLYMPUS DIGITAL CAMERA


ISO-2000

OLYMPUS DIGITAL CAMERA

Hope this was helpful!

Tuesday, August 18, 2009

Something for the Ladies (Suni’s Jewellery)

As some of you may already be knowing, my wife Suni is into making  jewellery. This is one of her really serious passions, I should say. She has so many hobbies that we have lost count of them longtime ago :-)

The onus of photographing her jewellery, naturally lies with me. And since I can’t charge her for the work, I take my own sweet time before I get interested enough to shoot them. Often we end up fighting on how to photograph a particular jewellery. The “creative difference” arise especially on the background to use and angle to shoot from. :-) Sometimes the fights are so serious that we have to suspend the shooting sessions to finish the fight :-)

Here are some of the fruits of our fights!

I generally use two setups. A macro-box, which I made at home, to photograph the close-ups of jewellery using flash. About 90% of jewellery close-ups are shot using this macro-box. And the sunlight + diffuser setup. This gives the subjects a more natural look.

Here is the link of how to make the macro-box or light-box. I used the instructions in this blog to make my macro-box

http://strobist.blogspot.com/2006/07/how-to-diy-10-macro-photo-studio.html

The Setup: Here are my 2 Setups

OLYMPUS DIGITAL CAMERA I use both FL-50R and FL-36R for when using the box. I use them in the wireless TTL mode, as can be seen. This means they are not connected in anyway to my E-30. The E-30’s built-in flash acts as a transmitter which triggers these flashes.
Picture shows the triggered flashes. The external flashes are extremely expensive. If you want a cheaper version of this setup, then you can also use 2 150W white lamps on either side, instead of flashes. They will be less than 1/10th of the price of flash.
OLYMPUS DIGITAL CAMERA The diffuser setup is cheap and easy. All you need is a window from which you get direct sunlight (morning or evening) and a diffuser. The big white, round thing in the picture is the diffuser  - setup directly in the path of the sunlight.
The object is placed in front of the diffuser.
The diffuser softens the harsh sunlight so that the object gets illuminated evenly.
This is the cheapest form of setup (about $40 for 5-in-1 diffuser/reflectors set) for macro photography. But here you may not have the luxury of changing the direction of light as you wish.

 Point to Ponder: What works best for jewellery photography

  • Always shoot from a low angle, this gives the jewellery you are shooting a perspective. Sometimes the top angle works, but I generally prefer low angle.
  • Jewellery items are not big subjects, so always try to get as close as possible without losing any part of the jewellery. The jewelry should should fill the frame. If it doesn’t then people may wonder “what the heck is the subject here?”
  • Shoot earrings in bunch – they not only help fill the frame, but they also make the picture interesting.
  • Add accents, items (such as a flower, twig etc) which enhance the effect of jewellery. Generally accents with contrasting colors work.
  • Choose a contrasting background which makes the jewellery stand out.
  • Shallow depth of field (small f-number) works best. It gives the jewellery an interesting tone. Always ensure that the front most part of the jewellery is in sharp focus. If you have the mid-section or the back part in focus then the whole picture will look odd and uninteresting.
  • Use post processing to enhance colors and contrasts.

NOTE: All designs are copyright of Sunita Purushottam

Click on the images to enlarge

OLYMPUS DIGITAL CAMERA The Red necklace (“kundan”). This was taken in natural light using diffuser
OLYMPUS DIGITAL CAMERA The kundan taken using the macro box.
OLYMPUS DIGITAL CAMERA Kundan on the red box inside the macro-box
OLYMPUS DIGITAL CAMERA The Pearl and gold bead necklace. Macro-box. Shot from top using tripod and 2 150W lamps.
OLYMPUS DIGITAL CAMERA The black bead necklace inside the macro box. Using 2 flashes.
 OLYMPUS DIGITAL CAMERA OLYMPUS DIGITAL CAMERA
Glass bead necklace
OLYMPUS DIGITAL CAMERA OLYMPUS DIGITAL CAMERA
Woven seed bead necklace
OLYMPUS DIGITAL CAMERA Black glass bead necklace
OLYMPUS DIGITAL CAMERA Assorted earrings + 1. Shot inside the macro-box.
OLYMPUS DIGITAL CAMERA
OLYMPUS DIGITAL CAMERA The white pearl necklace. OLYMPUS DIGITAL CAMERA
The onyx bead necklace

Sunday, August 16, 2009

What makes a good photograph?

Its not just one thing that makes a photo looks good, there are several reasons.  Lets discuss in a layman’s language some of the aspects of taking a picture that makes it appealing. I am only delving into the aspects which I feel affect most. I am not touching many other aspects here which are also very important (such as exposure, white-balance, tones, gradation etc).

Framing

Framing is probably the most important factor in making a picture appealing to anybody. If the picture is framed well, then half the job is done.

A badly framed picture below left makes a beautiful scene look ordinary. Where as a slight change in framing makes a whole lot of difference on the right

Goa - Close to sunset Goa - Close to sunset

While framing a picture one must always keep in mind a few things.

  • What you see with a naked eye may not be as appealing in a picture. This is because your eye has more than 180 degrees field of view (also called wide angle) and your view finder does not. So when you see a scene with a naked eye, its lot more appealing because of various interesting areas in the scene. However same cannot be framed using a camera view finder because it just isn’t wide enough. So while framing the scene though a view finder, just ask yourself- including what things in the frame would make it better?
  • Center composition/horizon in the center– These are some of the most common mistakes. Most people compose the picture with the subject dead in the center or horizon in the center. Picture on the left above has horizon dead in the center while the one on the right has horizon off center. And you can see the difference it makes. Sometime however center composition does makes sense (picture below of the flower left). But such instances are rare. So the best best is to have the subject off center (pic below on right).
Top of the world - Lake george - close to sunset close to sunset - Lake george


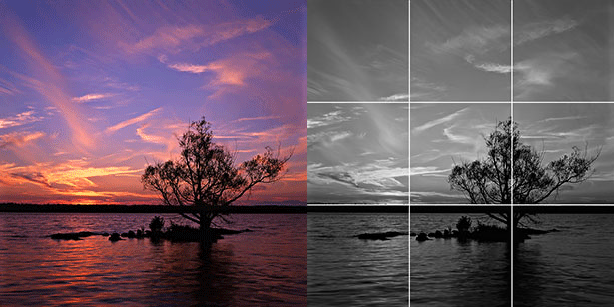
  • Follow the rule of thirds to frame. – The rule of thirds is a compositional rule of thumb in visual arts such as painting, photography and design. The rule states that an image should be imagined as divided into nine equal parts by two equally-spaced horizontal lines and two equally-spaced vertical lines, and that important compositional elements should be placed along these lines or their intersections. Proponents of the technique claim that aligning a subject with these points creates more tension, energy and interest in the composition than simply centering the subject would. See the GIF below.

Source: Wikipedia

Author: User:Moondigger

Description: Animated image based on Image:Rivertree_1_md.jpg, demonstrating the rule of thirds

File:Rivertree thirds md.gif

OLYMPUS DIGITAL CAMERA

Lighting

Lighting is the second most importing thing when taking a picture. When taking a picture, you must bear in mind no part of your picture is overexposed (i.e. where details are washed out) and no part is underexposed either (i.e. portions which are too dark). On top of this, you need to ensure that your subject is perfectly exposed. And that we all know is easier said than done.

Some of the simple ways of ensuring that you have good exposure is to check where the light is coming from. If the subject is backlit, for example (meaning light source is behind the subject), then its a good idea to use a flash to light up the subject. Or if the subject is under bright sunlight then its recommended that you use a diffuser so that shadow under chin are soft.

Most people think bright sunny day is the best time to photograph. But its the exact opposite – you need a good cloud cover for getting great photographs. And if you need blues skies in you pictures then the best time for taking pictures is early sunrise and late in the afternoon when sun is about couple of hours to set. That way you will get the best possible light for your pictures.

If you are photographing flowers or other subjects for close-ups– then always remember to use one of the following techniques

    1. Using diffuser when shooting outside under bright sun
    2. Shooting indoor under natural light (example near a window or in a flower conservatory)
    3. Shooting the flowers indoor with a combination of natural light and flash (to enhance the lighting effects)
    4. Shooting inside the close-up box (for details see here)

Hover mouse on these pics to see how they were shot.

Shot using macro box Shot using macro box

Natural sunlight with diffuser near an open  window Inside a conservatory


Picture taken at the time of Sunset - But with a difference!

Bokeh

Aperture setting will let you decide the Depth of Field (DoF). DoF is the background or foreground of the subject. Greater the DoF implies both the subject and background (or foreground, as the case may be)  are in focus. Lower the DoF – implies that the subject is clear focus but the background if out of focus (the out of focus background is also “bokeh” – this word originate from the Japanese word “boke” - meaning haze or blur).

Depending on the situation you may want to blur the background or show higher DoF. As in the case of the Flower shots above the background is blurred while the flower itself is in perfect focus giving it a unique appearance. Where as in the shot above of the parasailers – the DoF is greater, so the parasailer in the background also appears sharp. For more details on how to use aperture – refer to my previous blog on related to this topic.

  • To get greater DoF (clearer background) – You should set the f-number to high on your camera - so f/18, for example, would give a clearer background than f/8
  • To get a bokeh – set the aperture/f-number as low as possible.
OLYMPUS DIGITAL CAMERA With Bokeh – Shallow DoF (Aperture f/3.5)

OLYMPUS DIGITAL CAMERA

Greater DoF (no bokeh) (aperture f/8)

Freeze or Flow

Sometimes you may want to either freeze the action to give your picture a sense of motion. This is particularly affective in shooting children or sports.

Or sometimes you may want to show the flow. This is useful in shooting waterfalls.

  • To freeze the action set the shutter speed to fast.
  • To show the flow – set the shutter speed to as low as possible (without compromising exposure). For this you will have to set the Aperture small as possible. You would need a tripod to use slow shutter speed otherwise you would get blurred picture due to camera shake.

Pictures below show the examples of Freeze and flow

Freezing Action
OLYMPUS DIGITAL CAMERA

Finally – Do Not Hurry!

This is the most important aspect of photography. Most of us just point the camera and shoot. I blame this hurry on the most idiotic phrase ever coined - “point-and-shoot cameras”. Although most of our modern digital cameras (non-DSLRs) are small and allow you to take a pictures in a hurry, I feel “hurry” should be the last thing on your mind. Most modern digital cameras (non-DSLRs) are extremely versatile and have lot of features which you can use to get better control on your technique and on your results– sadly (for no apparent reason I can think of) these manually controllable features are not advertised properly by the makers (except in the manuals). 

Also I have seen people with a good DSLRs using the Auto mode to shoot pictures. It doesn’t get worse than that. You WILL get bad pictures.

By hurrying, you are losing out on experimenting, framing, proper exposure, aperture settings, shutter speed settings etc.  But if you take just couple of minutes to prepare and execute a frame, then chances are you will get a lot better result.

Remember – Camera is just an aid for taking pictures – Ultimately its the person behind the camera who has the canvas, brush and the colors. Use the tools properly and you will get good results.

See you again!

Wednesday, August 12, 2009

Shooting with the moon

Sometime ago, I wrote an article on “Shooting the Moon”. That article talked about photographing the moon as the sole subject. Actually shooting the moon alone is pretty simple – as simple as setting the shutter speed and using the proper zoom! After I published that article, I got a lot of queries from people asking for picture of scene with moon it in. They also wanted to know how to do it.

Although it looks pretty simple at first – it is not so.

This article will talk about how to shoot a scene with moon in it – as you will see this is a completely different proposition than shooting the moon.

There are 2 problems

Problem #1: Its almost impossible to get moon and the scene in the same lighting condition. Moon is almost always bright and the scene around is almost always dark. So if you have long exposure then you run the risk of sacrificing the details on the moon and it appears as smudgy white blob. If you have the moon clear then the scene around appears totally dark.

Problem #2: This is the problem of proportion. As we all know, moon is a lot farther than all objects around you. So when you look at the scene with moon in it through your lens, it will appear tiny – although the same scene appears ok when seen with naked eye. This is because when you see the moon through naked eyes, information  is actually processed by your brain. The brain’s algorithm takes into consideration the nearness of the scene around and the farness of the moon and presents a picture which is perfect. So it is not really WYSIWYG (What-You-See-Is-What-You-Get). But when you see it through the lens, this additional processing is not there. So you get a tiny moon in the scene.

Both these problems are clearly visible in the picture shot below.

OLYMPUS DIGITAL CAMERA

Can we solve Problem#1?Its almost impossible to get a perfect exposure with the landscape properly illuminated and moon in detail. So using the conventional photographic techniques - Answer is NO!

And what about Problem#2? You may think that using a telephoto instead of a wide angle lens would solve the issue, however if you do that then most likely the scene around would no longer be in the field of view and you are still left with problem#1 anyway!

What is the solution then?

There are 2 solutions

  1. Multiple Exposure – Taking 2 or more exposures on the same film or the same image.  One exposure will be of the moon and second will be of the landscape (or vice-versa), without advancing the film (film SLR) or using the multiple exposure setting (using DSLR). Note – All DSLRs do not have multiple exposure setting. Olympus E-30 has and a neat one too. It is pretty handy if you want to do some cool stuff with multiple exposure.
  2. Superimposition or Composite photograph – Combining 2 photographs to get one picture. You would need a decently sophisticated photo editing software like Photoshop CS3/CS4 or cheaper Photoshop Elements.

In the digital world the second option is cheaper and lot easier than the first because the first option needs you to be spot with both your exposures. With multiple exposure you have very little idea of where exactly you should place the second exposure (especially on a film camera). Today’s modern DLSRs allow easy multiple exposure. Olympus E-30 for example allows you to have the image exposed more than once and it also provides a handy overlay which tells you where your previous exposure was in the image.

However, I prefer the second method. If you have Photoshop or Photoshop Elements then 2nd option is a breeze.

Here is the picture using composite technique. Clearly much better than then the one above! :-) You can give dramatic effects by varying the size and shape of the moon.

OLYMPUS DIGITAL CAMERA

OLYMPUS DIGITAL CAMERA

Great thing about the composite technique  is that, you don't even have to shoot the moon and the scene on the same day or same night!

Here is another example. I shot the below 2 pictures of Moon and the Church separately.

OLYMPUS DIGITAL CAMERA OLYMPUS DIGITAL CAMERA

VOILA!! Here is the composite of the 2 pictures above. I might write the technical details on how I did this sometime.

OLYMPUS DIGITAL CAMERA

Take care….

– In some instance, you may be able to get a decent picture of both moon and the landscape. The best time for this is the early morning moon. This is the time when both moon and the landscape are illuminated by the sun almost with same lighting. This should give you a proper exposure. But this would mean being at the right time at the right place and on the right day. For most of us, its just too much! :-)