[Replace old hard disk with a new one with all data intact]
Well, to be honest, this is not something for the faint hearted. Let me say that first before I am accused of not warning everybody. :-)
If you are thinking of doing this yourself be sure you have these pre-requisites
- You need to be reasonably well versed in recognizing hardware components of a laptop.
- You need to understand what each component does and how to handle them (anti-static and all)
- You really need to understand what is SATA, PATA, IDE ports what's the difference between them.
- You need to have a good tool-kit to, preferable de-magnetized. Tool-kit should be capable of taking out screws from cranny places.
- You should know about various disk formats such as FAT, FAT32 and NTFS and know how initialize and format a new disk.
- Last but not the least, you need to have a decent cloning software. Without this, you will not go anywhere
So here you go. This is what I used for upgrade
1. I used a simple Philips screw driver tool-kit
2. I had an old Hitachi 80GB, 5400rpm, SATA HDD (hard disk drive) on my Toshiba M45 laptop. I was desperately in need for more space and faster disk. Also my old hdd was very noisy so I needed a quieter hdd. So I decided to replace this with a WD Scorpio 250GB , 7200 rpm SATA drive.
3. I used Apricorn (www.apricorn.com) DriveWire HDD adapter kit. This comes with 2 very essential things
a. An HDD adapter, which can take in a SATA, PATA/IDE hdd and provide a USB 2.0 interface which you can attache to laptop's USB port
b. EZ GIG II cloning software for cloning your old hard disk so that you retain all your data and software in the new hdd after you upgrade
Now lets start with the upgrade!
STEP 1: Figuring out HDD interface
1. Understand what kind of interface you current hdd has. Whether its SATA, PATA/IDE. This will tell you what hdd to buy. This is the most important first step. Here is how the SATA, PATA/IDE interface look
2. In order to do this you can either go through your laptop manual or open your laptop. I suggest you open your laptop to check what interface it has. This is because, sometimes the laptop manufacturers put generic config information in your manual which may be different from the actual config your laptop has, secondly its fool proof (my manual said that my laptop had PATA drive and when I opened it up, I found a SATA drive!).
3. IMPORTANT : Ensure that you have removed the power cord and battery of the laptop, otherwise you can destroy your HDD. Ensure that you ground yourself (either by touching something metallic or by having anti-static wrist band) before you touch the HDD. As a precaution, always handle the HDD by its sides.
4. To open the laptop hdd bay, turn over the laptop and locate the hdd bay. This area under on some laptops has a figure of disk etched (mine didn't), if not then check your manual to see where exactly the hdd bay is located. Open the bay cover by unscrewing the screws that keep the plastic cover in place.
5. Remember, the laptop hard drives are really thin, so they are almost always housed in a enclosure called a caddy. This is done so that the hard disk can be placed securely in the laptop, to protect the hdd and it also works as a heat sink. The hdd is generally secured in a caddy using star screws. We will discuss more about this when we are actually replacing the hdd.
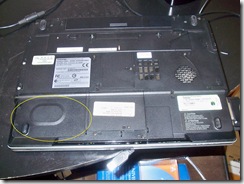
HDD bay under the M45 laptop. HDD is inside the plastic cover circled. | 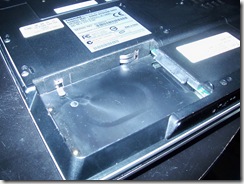
Inside HDD bay (HDD taken out). |

HDD inside a caddy | |
6. Once you remove the caddy containing the HDD, you should be able to see what interface your hdd has. Once you know your HDD interface, order a good HDD of the same interface from an online store (amazon.com, newegg.com have great deals).
Ensure that when ordering HDD its a 2.5 inch HDD for laptop. any other form will not fit in your laptop.
STEP 2: Formatting your New Hard Disk
Pre-requisite: You have purchased a new HDD to replace your old one.
1. Once you have your new HDD, first thing you need to do is to connect to the computer so that you can format it. Of course you need to connect it externally. For this we will use the DriveWire HDD adapter as shown in the figure below. Ensure that the power cord to the adapter is really tucked in tightly. Ensure that your PC is not running on battery and is connected to a power source.
 Apricorn DriverWire HDD adapter Apricorn DriverWire HDD adapter | 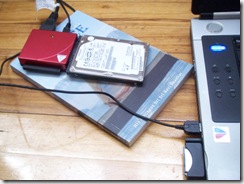
Another view of DriveWire Adapter with HDD connected. |
2. Once you have the drive connected as above, you need to format it. You can format the HDD from inside your Disk management in the Computer Management console. Ensure that you format the new HDD whatever format your old HDD is (FAT/FAT32 or NTFS). I will not go too much into how to initialize and format disk because that's a separate topic in itself.

Disk management - you can format your disk using this windows tool. |
3. The formatting operations may take upto couple of hours depending on the size of disk. My 250GB HDD was formatted in 1 hour. After you have formatted the drive, Proceed to STEP 3. below
STEP 3: Cloning the Old HDD to New HDD
Pre-requisite: You have installed the EZ GIG II software on your laptop. This is in the CD which comes with the DriveWire adapter
IMPORTANT NOTE: My Laptop had Windows XP. Apricorn EZ GIG II software can be installed on XP. If you have Windows Vista the Apricorn Software will not install on it, so you will have to boot the PC using the EZ GIG CD and perform the operations. Apricorn technical support has confirmed that they do not have a version of EZ GIG II yet (as of 25-Jan-2009) which will install on Vista, so booting through CD is the only way on Vista. To boot from your CD you would need to change your BIOS settings to tell the computer to boot thru CD.
This step is required because you would want to retain all your software and data which you have in the old hard disk to new hard disk. Ensure that your PC is not running on battery and is connected to a power source.
Open the Apricorn EZ GIG II application by clicking on Start-->All Programs-->Apricorn-->Apricorn EZ GIG II and follow the steps mentioned below
a. Click on Clone Disk
b. Click Next on this screen
c. Select Custom and click next
d. Select your source HDD. This is the HDD which is currently in your laptop. Ensure that you select the correct HDD. After selecting source HDD click Next
e. Select the destination HDD. This is the drive which you attached using the DriveWire adapter. It should show up as USB interface. After selecting destination HDD click Next
f. If you have formatted the new HDD as above in STEP 2, then the EZ GIG software will think that it contains data. So it will show a warning screen that if you really want to delete partitions (deleting HDD partition will wipe your data). Select "Delete Partitions from the destination hard disk" option, because we know it doesn't contain data as we just formatted it. Click Next
g. I am not sure why EZ GIG software even shows this screen? This is basically to tell you that its going to retain all data in your old hdd (the one currently in your laptop). I don't understand the logic of having one radio button on this screen! selection of which you cant change! And anyway, we would always need the old disk to be intact, just in case. Anyway, just click Next and proceed to next screen
h. In this screen, you get to choose how your new drive structure. Just choose "Proportional" option, because you would want the data to span as per the size of the new hdd. This will create a single partition. (If you are an advanced user, you could try choosing Manually Resize partitions, which gives you more control on how the partitions look)
i. This is the last screen, it will tell you all the step that will be taken to clone your disk.
Once you click on Proceed, the PC will reboot. On reboot, the the PC enter into a special mode (like it does when you do chkdsk /f and reboot) and the EZ GIG II software will start the cloning operation.
On my PC, for cloning my 80GB HDD to 250GB HDD, it took about 1 hour to complete its job. One the cloning is complete, it will show a Congratulations message and the it will ask any key to shut down the PC. Once the PC is shut down, you can disconnect your external DriveWire attachment.
IMPORTANT NOTE: DO NOT BOOT THE PC with the cloned HDD attached to the PC through DriveWire. This can screw up your system. I am not sure how, but this is what the Apricorn manual claims.
Once the cloning is done. Proceed to replace your Old HDD with New HDD in your laptop
STEP 4: Replace old HDD with new HDD in your laptop.
1. Disconnect all the wires and remove the battery
2. Open the HDD bay as described in STEP 1.
3. Remove the Old HDD from the Drive bay. Be careful not to apply too much pressure in trying to release the SATA/PATA connection. Pull the HDD gently out.
4. Remove the old HDD from its caddy by unscrewing the caddy screws from the sides, these screws hold the HDD in caddy. These are generally present on the sides of the caddy, though it may differ from laptop to laptop. Some laptop have caddies with no screws, just a push-in adapter kind.

SATA HDD inside the Caddy. Notice the screws on the side. | 
A PATA HDD in a caddy |
5. Once you have removed old HDD, keep it in safe place. Put the new HDD in the caddy and secure it with screws.
6. Insert the caddy with new HDD in the hdd bay and connect properly
7. Close the HDD bay with the bay cover.
8. Connect the battery and plug in the computer and power it up. As the PC boots up, the Apricorn EZ GIG software will give a short message saying completed successfully or something similar and then the PC will continue its boot sequence.
9. Once the PC boots up, you are good to go! You have successfully upgraded you HDD!! Enjoy!
Cheers and have a great day.


%5B2%5D.jpg)


