Saturday, September 6, 2014

Schedule-ALL (PRO) - A Unique way to schedule you connections!

As you probably know, I am a software engineer at heart. After a looooooog time I took to designing and coding. This time on Android. Last weekend I sat down and started to dabble with Java programming (which I have never done in my life, because I was a core Microsoft guy) and Android app development.

What started off as an Android learning session turned into a full-fledged app! 


For a long time, I have had an idea of having an app to automate all my data connections such as WiFi, 2G/3G, Bluetooth and Sync based on my usage. I needed this app to manage my connections and my Sync so that its optimized based on my usage.  I searched on Google play store and elsewhere for something which matched my requirement, I found quite a few and tried them. Many of them were good, some of them were crappy, some were too complex and some were way too expensive for what I needed.

So I thought about creating a simple app which would automate WiFi, 2G/3G, Bluetooth and Sync based on my need. That idea gave birth to this app called Schedule-ALL.

You can buy this app here at Google Play Store

UPDATE: After sharing this app with family and friends - I had one consistent question from most of them. WHY ON EARTH WOULD I NEED THIS APP IN THE FIRST PLACE??
I thought I had answered that in my FAQs section, but apparently that's not enough. So let me try it one more time
About Data Connections and Sync In Your Phone
Firstly - Depending on the model of your phone, it may have upto 4 types of data connections

  • WiFi
  • 2G/3G
  • Bluetooth
  • NFC (Near Field Communication)
Most have have at least the first 3 types above. Important thing to know about these data connections is that they all generate radio waves when they are on. So when something "generating" something, it needs energy. In your phone that source of energy is the battery. So if your phone has any of these connections ON then it means your phone is expending battery to just by keeping these on, whether you use them or not. 

Secondly - There is something called a Sync service which runs in the background. This service is used by your phone to sync things like Emails, Contacts updates, Newsfeeds, RSS feeds, Regular photo uploads, Google+ updates, Facebook Timeline updates and so on. So Sync takes up a lot of data. Since Sync requires either WiFI or 2g/3g it also takes up your battery.

NOTE - Sync is not used to send/receive Whatsapps, hangouts, Facebook or other notifications . So putting Sync off doesn't affect these messengers.

Most manufacturers, by default, keep WiFi, 2/3G, NFC and Sync to be always on. There are 2 adverse effects of this.

  1. Your battery drains unnecessarily
  2. Your phone consumes a lot of data in the background without your knowledge

What this app does is the following

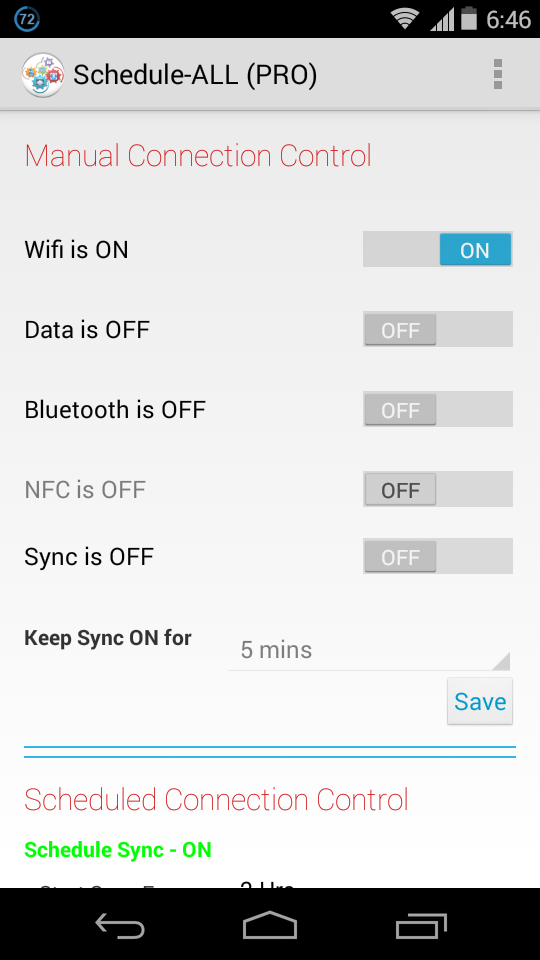
  1. Lets you schedule which connections (WiFi, 2g/3g and Bluetooth) is ON at what time of the day. Let's say, if you are in office from 9 AM to 6 PM, then you dont need the WiFi to be ON at that time. But you would need your 2g/3g Data and Bluetooth (for phone call) to be ON
  2. Lets you schedule at what intervals your sync service runs. Lets say you are OK to check your mails every 2 hours, then can schedule Sync to run every 2 hours
  3. Apart from this it lets you choose WIFi as a priority data connection over 2G/3G (by using those check boxes). This ensures you are not unnecessarily on 2g/3g data connection when you can as well be on WiFi. This reduces your 2g/3g data consumption.
Benefits of this kind of scheduling is 2 folds
  1. Only the RIGHT data connection (2g/3g or WiFI) is kept ON - There by reducing battery drain
  2. Sync is not always ON - Reducing battery drain and reducing 2g/3g data usage when on 2G/3G network


App is based on the following Design Philosophy
  • It should be simple and intuitive to use
  • It should not take you through too many screens
  • It should let you schedule connections toggles and sync toggles in less that 10 seconds
You try it and see for yourself I met my own design philosophy


I will now let you enjoy some of the screen shots and the App FAQs


1. What does the app do?
App allows you to perform following actions

a. Manually Toggle WiFi, Bluetooth, Data and NFC connections.

b. Manually start Sycn and set the duration for the sync to run.

c. Schedule Sync to start every X minutes and run for Y minutes once it has started.

d. Schedule Wifi, Bluetooth, Data and Sync to start and stop at specific time of the day everyday.

e. Cancel All the previous schedules (so you can start a fresh).

2. Once I have set the schedules, how long will these schedules run?
All schedules will run as long as you don’t cancel your schedules (Using 'Cancel All Schedules' button) or un-install the app. The app will re-schedule all your previously set schedules on reboot. So you dont need to worry about setting them again. Schedules will also be intact even if you update the app (without un-installing) from the play store.

3. Will the app drain my battery?
No, app itself is not in the memory after you have set your schedules. App uses Android's AlarmManager APIs to delegate the schedules to Android OS. It behaves in exactly the same way your android alarm clock does, except everything is in the background, so you wont even notice it.
4. Why would I need this app?
If, like me, you have set times when you want Data/Bluetooth/WiFi/Sync to be enabled or disabled everyday and you dont want to manually go into settings to do all this, this app will do it for you. Ensuring right connections are enabled at the right time. Controlling sync will help you to not only ease your life but it will also save your device's battery life.

My Settings are:

Sync: Run every 2 hours for 5 mins (this is more than enough for downloading emails over 3G or Wifi. On 2G you may increase the duration to run to maybe 10 mins)

Wifi: Start time-17:00 AND Stop time-10:00 (this is the time I am at home, I start wifi an hour earlier than I reach home)

Data: Start time-8:00 AND Stop time-18:00 (this is the time when I am out)

Bluetooth: Start time-8:00 AND Stop time-18:00 (this is the time when I am out)

5. Why does manual toggle of NFC take me to settings? and why cant I schedule NFC?
Answer to first question: Google Android APIs doesnt provide any direct control over NFC connections to programatically stop or start it. Apps can only use the NFC connection, if it has alreayd been started. I have given the next best option to let the user go to the system settings screen and toggle it manually.

Answer to second question: Since Android APIs do not allow to manually start/stop NFC, its pointless to provide a scheduling mechnism, unfortunately! :-(

6. Will Schedule-ALL help me save my battery?
Although I dont explicitly claim that Schedule-ALL will save battery juice, it has been proven that using connections that you only need and stopping all other connections does improve battery life. Most battery saver apps use controlling connections as one of the foremost weapon to protect battery juice from draining. Also Sycn is huge drainer of battery and it uses a lot of data if its on continuously. So yes, it will definitely help your device battery perform better also saving you data usage.
7. How to use settings 'Stop Wifi only if Wifi is Disconnected', 'Start Data Only if Wifi is NOT Connected' and 'Stop Data Only if Wifi Is Connected' ?


Stop Wifi only if Wifi is Disconnected - If you have scheduled your wifi to be stopped at a certain time say at 1:00PM everyday if you check this box then the app will check if you are still connected to any WiFi network. If you are connected to any Wifi Network then it will not disable the WiFi and rechedule itself to check back to see if the Wifi can be disconnected in 30 minutes.

Start Data Only if Wifi is NOT Connected - This will prevent your scheduled data from starting if you are connected to WiFi.

Stop Data Only if Wifi is Connected - This will start the data only if you are disconnected from WiFi.

There 2 Purpose these settings server

1. They ensure that Data (2G/3G) is not enabled unnecessarily if you are already connected to WiFi.

2. They ensure that you always connected to one network or the other.

These settings only affect your scheduled connection controls. As usual, you can always override these with manual settings.
8. What is 'Sync ONLY when connected to WiFi?

If you have scheduled your sync to start at specific times, then checking this setting will start the sync only if the device is connected to WiFi network. If you are n 2G or 3G then the Sync will not start. This doesn’t affect the manual Sync.

Wednesday, October 24, 2012

Dussehra–With My First Love

Cameras, that is! What did you think! Ever since I was a boy, I was fascinated with cameras.

I remember when I first held a camera, I was just into my teens, it was a black and white fixed lens camera (it only took black and white film) . It belonged to my elder brother, who had bought it from his pocket money. But since he was studying out of town, the camera fell into my hand. I got hooked on to it immediately. I realized that for the first time in my life I had a hobby. I had begun to enjoy it tremendously and was very sad when I had to let it go because my dad did not have enough money to develop the film or to buy one. But I was a completely different person as long as I had it.
I knew then that, if ever I had a hobby; photography would be the one and nothing else.
When I went to college, my pocket money was enough for me to buy a new camera for myself. I bought a Konica HotShot flat camera. This camera took a rather strange 110 film cartridge. It had dual lens, one for wide angle and another for telephoto. I used it throughout my 5 years in college (bachelor and masters) until it stopped working. It was my most precious possession in my college days.
Once out of college, I got busy with my job and family and I had very little time to pursue my photography. In 1999, I went to UK on an assignment through my company. While in the UK I found I had a lot of time at my disposal, so I decided to rekindle my first love affair. That’s when I bought my first SLR – this was year 2000. The Camera was EOS-300. I hadn’t touched a camera for 6 years and suddenly finding a huge SLR in my hand was overwhelming. I figured quickly that I had to learn a lot, things I never paid attention to earlier. I still have that camera and is still in a great condition. Later I upgraded to Canon EOS-30 in 2002 - a beautiful piece of equipment.
From then on, I was always in touch with my hobby off and on. Up until 2007 however, it hadn’t yet turned into my passion. In 2007 I bought my first DSLR, the Olympus Evolt E-330 and that’s when my hobby turned into a passion.

Now coming back to Dussehra. Let me give you a background of what Dussehra is – Its a Hindu festival celebrated on the tenth day of the Hindu autumn lunar month. The day marks the victory of Goddess Durga over such demons as Mahishasur. It is a day when devotees worship Goddess Shakti. Shakti represents strength, ability and courage. This day also celebrates the victory of Lord Rama over the demon king Ravana. More Info here.

It marks the beginning of harvest season. And every household in rural India perform prayer (pooja) to sanctify their tools and items used in harvesting. In urban India people perform pooja to sanctify the tools that they use in everyday life such as vehicles and instruments of daily use.

This year, for the first time, I performed pooja of my photography instruments. It brought out the celebratory mood I am always in whenever I am with my first love i.e. my camera!! :-)

Hope my photography improves a bit!

Here are some of the pics

Dussehra (1 of 2) All my stuff in one place :-)

Dussehra (2 of 2) The top view..
Hyosung GT 650R My Second Love  :-)
My Hyosung GT 650R

Thanks and God Bless…

Love

-Puru

Sunday, October 21, 2012

Celebrating Birthday! (with OM-D and RC flashes)

On 20th Oct my son, Advaya, turned 9. This time I had the most powerful micro 4/3 gear to shoot his birthday. I was contemplating various ways to shoot this event.
Initially I thought I would shoot only with my prime 45 f/1.8 on OM-D. But while doing the tests I found that I don't have enough space to move back and forth to get the whole group. So I decide that I will shoot most of it with 12-50 and then switch over to 45mm when kids settle down. This idea worked like a charm, as you will see.
My next issue was the lighting. Since the party was going to be indoors, with tungsten light, I knew I would have limited light. Although this is sufficient for OM-D + 45 1.8, its definitely not enough for 12-50.
So an idea stuck me. I have never really shot any event with RC flashes. I have both FL-36R and FL-50R. But I have always used them on-camera with E-5. And since I have already decided that I would shoot this event only with OM-D, I had to use flashes in RC mode. both FL-36R and 50R are too bulky on OM-D.
I was quite apprehensiv
e about my ability to set them up correctly.
So began my trial-and-error, make-shift method
  • Initially I thought 1 FL-50R should be enough. Hall in which the party was going to be was not large (10 x 15 feet). Generally on-camera flash would cover this space nicely, but in RC mode I found that lighting was uneven in certain angles.
  • Since the kids would be moving around, I quickly understood that one flash in RC mode at a fixed location will not be enough.
  • So I decided to use 2 RC flashes to cover entire area and rely on the bounce to provide over all illumination of the entire area from any angle.
  • I setup my flashes at either side of the room at an height of around 7ft and used the Gary Fong’s Lightsphere diffuser on each of them. And directed them towards the ceiling to get maximum illumination through bounce. Gary Fong’s Lightsphere are by far one of the best diffusers I have seen. They are absolutely brilliant in providing soft and even illumination
  • I set the flashes in 2 groups in RC mode. I set FL-50R in group A and FL-36R in group B.
  • I then used group A in Manual @ 1/10 of the power and group B in Manual @ 1/4 of the power.
  • I used ISO between 200 to 800 to gain sensitivity. I didn't want to increase the power on the flashes because I wanted fast recycle as kids were moving around.
  • Once the setup was complete, Kids began to arrive and shooting started!
  • I found that this setup provided pretty good overall illumination from all angles. Wherever the pics were underexposed, I corrected them in Lightroom. And OM-D’s dynamic range is so fantastic that I can get details from pics which are underexposed by upto 2.5 stops!
Even for a novice like me, I found that setting up Olympus gear in RC mode is breeze!
So my final gear OM-D, 12-50, 45 1.8, FL-36R and FL-50R (in RC mode. FL-LM2 to trigger the RC flashes)

Another thing is the ease with which you can change the flash intensity! Absolutely brilliant!


Monkey business! :-) With friends!
1/60s . f/4.1 . ISO 200 . 16 mm (12-50)
For the pic! More friends!
1/60s . f/5.1 . ISO 500 . 25 mm (12-50)
Crazy guys! Blast with the friend!
1/60s . f/5.0 . ISO 500 . 24 mm (12-50
Shooting the shooter...! :-) Shooting the shooter!
1/60s . f/3.5 . ISO 400 . 12 mm
Performers and Audience Dance time!
1/60s . f/3.5 . ISO 400 . 12 mm
Michael Jackson! +1/60s . f/3.6 . ISO 400 . 13 mm
The group! Enjoying!

1/60s . f/4.4 . ISO 400 . 19 mm
Makeshift Piata Playing with Pinata!
1/60s . f/3.9 . ISO 400 . 15 mm
Always a monkey! Monkey business!
1/80s . f/1.8 . ISO 200 . 45 mm
More Michael Jackson! For pics where I didn’t use flash, I set the white balance to custom. For flash I used the Auto WB.
+1/100s . f/1.8 . ISO 4000 . 45 mm (no flash)
Freeze dance time! Freeze dance

1/80s . f/1.8 . ISO 200 . 45 mm
Falling in Line! Standing in line for the the game!

1/80s . f/1.8 . ISO 200 . 45 mm
Some symemetry...finaly! Making them sway!
1/80s . f/1.8 . ISO 200 . 45 mm
Tummy full! Tummy is full!

1/100s . f/1.8 . ISO 6400 . 45 mm (no flash)
I am 9! Yes, I am 9!!

1/100s . f/1.8 . ISO 3200 . 45 mm (no flash)
U r 9 babay! U R 9 Baby!
1/60s . f/5.5 . ISO 400 . 31 mm
Is it that strange?! Yes, thats the cake! :-)

This was a bit underexposed, corrected in Lightroom.

1/60s . f/4.7 . ISO 400 . 21 mm
Finally cutting it! Time to cut it baby!! :-)

1/60s . f/3.5 . ISO 400 . 12 mm
Birthday bumps!! Time for birthday bumps! :-)

1/60s . f/3.5 . ISO 400 . 12 mm
My babyyyy! :-) With daddy!

1/60s . f/4.7 . ISO 400 . 21 mm
Mom and Son Momma’s boy! :-)

1/60s . f/4.5 . ISO 400 . 19 mm
I won!! Yes! I am a big boy now!

1/100s . f/1.8 . ISO 5000 . 45 mm (no flash)
Shooting with prime is joy I have never felt before!
I hope you like my blog as much as I loved shooting it!
Its tough to put kids in a small space and shoot them, but with little bit of patience, it can be done :-)
Love!
More pics here

Monday, October 15, 2012

My Observations in the East

I recently went on a vacation to Singapore and Malaysia. One of my pass times is to observe people. In this trip, I found I was observing the various devices that people use for photography and also different mannerisms of the native people (both oriental and Indian origin)and tourists . So here goes

Photography Related Observations

  1. Oriental women use following devices for photography (in that order)
    • Cell phone/iPad (Yes! iPad for photography!)
    • Point and Shoot
    • Interchangeable Lens System (Sony NEX Series and Olympus PEN Series)
  2. Oriental men prefer (in that order)
    • Point and Shoot
    • DSLR (Mostly Nikon or Canon, saw a couple of Pentax and Sony. No Olympus DSLR)
    • Interchangeable Lens System (Sony NEX, Olympus OM-D and PEN. Yes! OM-D is more popular, in m view, than PEN with them)
  3. Western tourist prefer Only point and shoot. I saw only a couple of them using DSLRs. No Interchangeable Lens system
  4. Indian men tourists mostly prefer DSLR (with popup flash on! ;-))
  5. India women tourists prefer cell phone or point and shoot
  6. Indians who have settled in Malaysia and Singapore do not take photographs :-)
  7. I found that people don't prefer using tripod. Both in KL and in Singapore, during my night shoots, I found only couple of tripods apart from mine.

Other observations are

  1. Oriental native women chat/text while walking. Not sure how they can see the road, but they manage not to bump into people.
  2. Oriental native men prefer playing games on their cell phones
  3. All of them have latest smartphones. Samsung and HTC are the preferred brands. iPhones are few and far in between.
  4. People of Indian origin who have settled there prefer to talk over phones more than oriental natives.
  5. Indians do not prefer oriental restaurants. Oriental people (mostly natives) seems to love Indian food.
  6. Westerners prefer china town eateries to Indian joints.

Tuesday, September 18, 2012

Olympus E-M5–An Unbiased Review

Disclaimer: I am not sponsored by Olympus (I wish they did though, for I am helping their cause!). So I am not interested in making them rich. This is an unbiased review based on my experience alone. The cameras, lenses and any accessories that I mention here are owned by me and not given to me by Olympus.

The Question: Why I bought E-M5? I already have E-5, E-P2 & E-30, so why on earth I need another camera?

The Answer: Before buying, I did extensive research on the performance of E-M5 in various blog posts and also on the various forums and photography sites.

I was drawn in to E-M5 for following reasons -

  1. Brand New Sensor and High ISO Performance
  2. Weather sealing in a compact body
  3. Much matured IBIS
  4. EVF with sensor
  5. Pro DSLR Like Button Layout and Controls
  6. Touch screen operation
  7. Fast AF and 9FPS

I was not too concerned about image quality and stuff like that, because I am a long time Olympus user and I know what to expect. IQ, if anything, can only go up the scale.

So lets get on with the review on these 7 points

Brand new Sensor and High ISO performance: Sensor in E-5 was essentially same as in E-P2. But in my opinion E-5’s High ISO performance was much better than E-P2. From personal experimentations, I find that, in E-P2, I could dare to go MAX up to ISO 1600 (with a lot of caution). But in E-5 I could go up to 3200 easily. I have shot very frequently at ISO 2000 both indoors and outdoors with pretty good result .

But one issue always nagged me. I was still afraid of getting unwanted Chroma noise at ISOs over 800 on E-5 and E-P2. So I never put my camera on Auto ISO in these 2 cameras. If light was low, then I would test out the output at various ISOs by zooming in on the frames, and many times I would end up deleting the picture because of smudgy Chroma noise, especially in E-P2. E-5 performed much better, but I was still unsure of leaving it on Auto ISO from say 200-3200 because I knew at the back of my head that the sensor is same, although E-5 is much better at handling ISOs over 1600 upto 3200 (Don’t ask me how or why though!).

OLYMPUS DIGITAL CAMERA

E-5, ISO-2000, @283mm of 50-200 + EC14, 1/250s f/4.9

But the situation changed with E-M5. One of the first tests I performed as soon as I got the unit home was its performance at high ISO. I generally hate using strong adjectives for anything (be it humans or things), but the pictures from E-M5 upto 6400 ISO were simply amazing and absolutely beautiful. I couldn’t believe my eyes and I double checked the settings a few times to see I was indeed shooting at 6400 ISO. To put it mildly, ISO 6400 performance of E-M5 simple blew me away. Very little luminescence noise (nothing which cannot be removed using Lightroom or Noiseware) and ZERO Chroma noise. In fact, there is very little smudgy Chroma noise even at 16000 ISO. So now you can imagine why I was impressed.

I have now reached a point where, on my E-M5, Auto ISO is always set at 200-6400 and I always shoot in Auto ISO (unless I am shooting on tripod). I now know that even if I get noise, I can always remove it in Adobe Lightroom easily. So, my worries about high ISO shooting have been laid to rest. Fantastic Job Olympus!! Hats Off!!


OLYMPUS DIGITAL CAMERA
ISO 6400

E-M5,  @56mm, 1/6s, f/4.1  ISO-6400

Noise reduced in post processing

E-M5, @50mm, 1/8s, f/6.3 ISO-6400

Noise reduced in post processing

ISO 16000


OLYMPUS DIGITAL CAMERA

E-M5, 1/15s, f/5.5, 32mm ISO 16000

Yes you read that right, it is ISO sixteen thousand

Noise reduced in post processing

E-M5, 1/30s, f/4.9, 32mm ISO 6400

Noise reduced in post processing

OLYMPUS DIGITAL CAMERA OLYMPUS DIGITAL CAMERA


E-M5, 1/10, f/5.6 ISO-25600 @33mm
Noise reduced in CS4
Chroma noise visible, still pretty usable

E-M5, 1/20, f/5.6 ISO-6400 @300mm (Lumix 100-300)

IBIS on and Mega OIS Off

Noise reduced in Post processing


Weather sealing in a compact body: Looking at E-M5 you would be excused for thinking its just another point-and-shoot camera. Its only when you hold it that you realize how sturdy it is. For such a small thing, it is quite heavy when you actually lift it. You can immediately see how well its built and whatever Olympus claims about its weather sealing must all be true and more. However, and this is just my personal apprehension, I would still say there is nothing like E-5. That tank can take anything. So I wont be doing to E-M5 what I did to E-5 in this video anytime soon. Having said that I know I can rely on its weather sealing as much I rely on E-5’s weather sealing. I have already taken E-M5 on heavy shower a few times and didn’t even bother to wipe it. Olympus has done what it does best, impeccable build quality!

This picture was taken under heavy rain. I was then standing in the rain with raincoat on and adjusting the settings while the rain poured all over E-M5

_7140106

E-M5, 1/80s, f/11, ISO-320 (Pouring Rain)


Much matured IBIS (In Body Image Stabilizer): My first camera with IBIS was E-30 and it’s a beauty, never let me down. Then came E-P2, although E-P2 had same IBIS mechanism as E-30, it was miniaturized to fit into E-P2 body. While it did a good job, I am still sceptical about claims of 4stop advantage by Olympus. I think that was a bit overrated. In fact when using Panasonic lenses (45-200 and 100-300), I prefer turning off IBIS on E-P2 and turning on MEGA OIS on the lenses. I feel IBIS on E-P2 worked, albeit with short comings.

Circa 2010 – Enter E-5- I think Olympus did put in quite a bit of work on the IBIS unit and I feel it had matured quite well. They just didn’t tout it as “All New IBIS” because, I think, it was essentially same as that in E-30 but with bug fixes. But I was impressed with those bug fixes, especially reset noise and the reliability. I truly believe it can provide upto 5 stop advantage as claimed by Olympus, although I have no scientific way to prove it.

Circa 2012 – Enter E-M5 – Just when you thought IBIS has matured and nothing can be improved further, Olympus surprises all of us with 5 axis IBIS! All the previous ones were only 2 axis i.e. vertical and horizontal movements. As we all know those are not the only movements you can have when you have camera shake. So Olympus added 3 more dimension, the pitch, yaw and roll and I must say, it works like magic, as can be seen from pics above. 

All Pictures above were taken handheld. Goes to show the amazing quality of IBIS

EVF (with proximity sensor): While I loved E-P2 for the cute little camera that it is, I have never been a huge fan of shooting through an LCD screen. The VF-2 EVF which I bought is fantastic, but I hate its form factor and also the fact that it sits on top of hot-shoe thus disabling my flash use with EVF. The built-in EVF with E-M5 is just what was needed and it does its job quite well. Suffice to that, I wouldn’t have bought E-M5 if it didn’t have built in EVF, simple as that. Having said that, there are a few bugs;

Things that can be improved

  1. Its not as bright as the VF-2. Provides a less brighter view than VF-2 or for that matter OVF of E-5
  2. The proximity sensor is too sensitive, when you are in review mode and use the touch screen, the screen changes over to EVF because your finger is too close and its sometimes very annoying
  3. When you bring the camera to eyelevel when you see something worthy to shoot, there is about 1 second lag before EVF takes over. This is annoying because once EVF takes over you have to wait till the target AF is acquired (which fortunately is super FAST) before you shoot. So it takes away the quickness that you desire and can have from such a beautiful camera.

Having said this, built-in EVF is definitely a right step forward. I think, it should be part of all Pen cameras. Few minor bugs need to be ironed out in next version.

Pro DSLR Like Button Layout and Controls: While E-P2 had pretty good controls over all. The tiny rotating ring on top of multi direction buttons was hard to use also the dials were not in the “standard” position. This resulted in a learning curve. The dials and buttons on E-M5 are perfectly placed and render it the pro look. It must have been a tough job for Olympus designers and engineers. What with having to work with such a small body and to give it a pro look! but the dials and buttons have been thought out well and they are adequate.

There are a few kinks in the armour though;

Things that can be improved

  1. You cannot set all the arrows of a four way control to various functions.
  2. There is no dedicated AF point selection button, have to use arrow key (that’s the reason for point #1 above, I think)
  3. No dedicated AEL/AFL button. Fn-1 acts as the AEL/AFL by default. Since I use AEL quite often I need it set on Fn1 always. So I “lost” my one function button on camera. E-P2 has AEL/AFL button, why not E-M5?!!.
  4. Although not related to buttons – there is no wireless remote support! Cant believe why you would leave that out!
  5. No direct Access to MySets. Why do you need the video position on the mode dial? You could have easily used this space and added few more entries to have MySets available over there. Or you could have designed Mode as a button as in E-5, which is such a space saver and so easily extensible!

So those are the issues in the design which need to be sorted out to make E-M5 truly professional.

Touch screen operation: First of all, I am not a huge fan of LCD or touch screen for that matter (except to review photos). But when I got my E-M5 I started playing along with it. I soon realized its importance especially in shooting candids, shooting with tripod and macros. its much better using the touch screen than the shutter release button when on tripod or shooting macro. It is definitely an improvement in right direction. I was pleasantly surprised how I have gotten used to using touch screen so much.

Things that can be improved

The issue with touch screen is with its usefulness (or lack of it) when using for super control panel. All you can do is just select an option and that too after you press OK button. For changing the settings you still have to use the dials. I wont say that’s a very good software design. I am a software engineer, If I designed this piece, I would have ensured the user has full control over the changes through touch alone. Not very clever I must say!

Fast AF and 9FPS: Fast AF or F.A.S.T AF as Olympus likes to call it, stands for Frequency Acceleration Sensor Technology. Not sure what it means, but it works!

While the AF acquisition system on E-30 and E-5 is very fast and fantastic but the one in E-P2 leaves a lot to be desired. The AF acquisition on E-M5 is really fast and really accurate. And the best part is it works wonderfully even in extreme lowlight. I had NDx400 and CPL on, which is like -10 stop! And still the camera was able to acquire AF in a dimply lit room! Now, for me that is really amazing! Truly a job done well by Olympus!

9FPS – While for most shooting the 5FPS on my E-5 is adequate enough, but when I went to shoot birds in the jungle I found it wanting since I was afraid to up the ISO. Now coupled with High ISO performance and 9FPS I am an extremely happy guy as I am able to capture those fine moments.

Things that can be improved

Only one issue though. The buffer is too small. It fills up after 13 frames and I have to wait another 30 seconds while it clears. I wish it had better buffer.

Conclusion:

Sensor and High ISO Performance

10/10

Weather Sealing and Build

10/10

IBIS

10/10

EVF

8/10

Button Layout and Controls

6/10

Touch Screen Operation

5/10

Fast AF and 9FPS

10/10*

* Although Buffer is not too great, but the 9FPS still works fantastic for me

So, that to my mind covers E-M5. I don’t think I would be buying E-7 or E-9 or whatever Olympus comes up with as next gen pro system in four third (there are quite a few rumours around). E-5 in conjunction with E-M5 should serve me for a long time to come (my guess is at least 5 years). E-M5 has given me everything I needed in a (small, pro) camera.

There are other minor enhancements like inclusion of Anti Shock in the mirrorless system! which can be used in conjunction with sequential shooting to achieve time lapse photography (http://www.Olympusmpusamerica.com/cpg_section/cpg_support_faqs.asp?id=1583#28 )or the Ability to use in camera flash even while using it to trigger remote flashes (not sure if this exists in E-5). But those are icing on the cake for me! :-)

Ciao!

Puru

PS: Let me know if there are an inaccuracies through my Contact Page.

Wednesday, September 5, 2012

NDx400–Long exposures in broad daylight “How-to” guide

Finally after a long long wait I got my ND filter, the NDx400. Question is why do you need it and here are the answers;

  • NDx400 is Neutral Density filter with an ability give you –9EV (minus 9 stop) advantage while shooting.
  • What does that mean? It means it will allow you to use very slow shutter speed even in broad daylight, which otherwise will not be possible even with smallest aperture (f/22).
  • This means, you can shoot a velvety waterfall in daylight if you like for instance

Here is an example.

WITOUT NDx400 and CPL:

I shot this scene at around 9 AM bright overcast conditions

F/11, 1/200, ISO200 (Saturation and contrast slightly adjusted in CS4)

OLYMPUS DIGITAL CAMERA

Notice the sky, looks dirty with the clouds. Picture is not too appealing overall and looks boring.

WITH NDx400 + CPL: CPL=Circular Polarizer. I used it because it was already attached to my lens. I attached NDx400 on the CPL. This is called filter stacking. Beware – Filter stacking will give you vignetting  i.e. one or more dark corners in your pics. It gave me one, which I removed in Photoshop. Filter stacking is NOT recommended, unless you know what you are doing and you know how to remove vignetting in PP)

Time around 9AM with bright overcast sky.
OM-D with 12-50 12MM
NDx400 + CPL
F/22, 30s, ISO200, IS Off, Anti Shock ON, Noise Reduction ON, Noise Filter HIGH
Only Contrast and saturation adjusted in CS4

OLYMPUS DIGITAL CAMERA

Notice how the ordinary mundane scene has changed with silky and velvety background, making the structure standout as if in  3-D .

The Trick

But its not simple to use NDx400 as if it were a CPL filter. When you attach the NDx400 to your lens, you will find that your camera will, in best case, struggle to focus OR in worst case - which is more often than not - will refuse to focus. The reason? its the reduction of light which the NDx400 causes. By using NDx400 you are reducing the light intensity to less than 1/500th of the original intensity. So its very dark when you see through the lens.

So in order to use the NDx400 properly, you need to do a little trickery to make it work. And here is how to do it

  • Set the camera on tripod. Make sure the Anti-Shock (mirror lockup) is on and In body and In Lens stabilizers (IS/OIS etc) are OFF
  • Set the ISO @ 200 or any value you need. Make sure this constant throughout.
  • Set the camera in the aperture priority mode (A/Av mode using the dial). Set the aperture to, lets say, f/11 for the landscape shooting.
  • Focus the camera on the scene and press the shutter half way. Note down the shutter speed. Lets say it gives you the reading 1/60s
  • Now set the camera to Manual Focus WITHOUT CHANGING other settings like aperture and focal length of the lens.
  • Change the dial to full Manual Mode (M) from Aperture Priority mode. Attach the NDx400 filter on the lens
  • Ensure that your Aperture is still at f/11 as set above. Now change the shutter speed to –9EV (minus 9 stops) of what you noted above. Original shutter speed without NDx400 was 1/60s, so with NDx400 filter you need to step –9EV down which will give you 8secs.
  • You are all set, press the shutter and see the result. If its underexposed, then reduce the shutter speed further, if its overexposed then you can reduce the aperture to maybe f/16 if you want to keep same shutter.

I know its a bit of a hardwork, but your results will be priceless!

Hope you get inspired!

CIAO!

Love

Puru

Monday, June 4, 2012

Finally–NYIP Certified!

Its been a long, almost 3 year journey. I started my NYIP course in professional photography way back in October-2009. Just before I moved back to India in January-2010. When I started it, I was sceptical if I would be able to complete it. But Suni insisted that I should do it and almost literally forced me to join it.

In the end I am glad I joined. Although I have never been big on certifications and degrees (more a believer in practical knowledge), this certification however brought tremendous joy to me because I was doing something I really love, in fact I was doing only the thing I really love – My photography!


Wednesday, May 9, 2012

Lightning Strike – How I did it?

Yesterday, I was standing on the balcony of my flat in Pune smoking a hookah. It was windy and there was some lightning activity. After a few minutes the lightning activities in the northeast horizon increased dramatically. I always wanted to shoot lightning and though this was my opportunity. So I grabbed my E-5 and shot some!

I have never photographed lightning strike before, but I knew that it was not a piece of cake for the obvious reason that you need to trigger the shutter at exactly same time as the lightning strikes. Generally lightning activity lasts about a 1-2 seconds. So its not easy to time your shutter release. Sometimes it helps to do things the old fashioned way and that’s exactly what I did.

My Technique

  • I Set the camera in Full Manual Mode – with aperture f/2.8 (Max aperture for my lens ZD 12-60). I was shooting handheld, so needed a faster shutter. I did not set it at Shutter Priority or Aperture priority because I did not want eaither my shutter or aperture to be set by camera.
  • I Set the focusing on Manual and set it to focus on infinity @ 12mm. Manual focusing to ensure that I am focused on infinity always.
  • I started with 1/25s shutter speed, but found that lightning was overexposed, so increased it to 1/50 @ ISO-400 (increased ISO to get 1/50s)
  • I set the drive mode on sequential shooting @ 5FPS on E-5 (which is max). In-body IS (VR) was ON
  • Since the drive mode was set to sequential, the Noise Reduction on E-5 is automatically set to OFF. I set the Noise Filter to STD and SHADING COMP = OFF
  • I then held the camera and waited for long time for lightning activity on the horizon. Whenever there was a dense lightning I would trigger shutter.
  • I might have shot about 50-60 frames. I got about 7 usable frames of lightning strike. Mainly helped by dense lightning activity (meaning continuous periods of lightning of 2-4 seconds). If lightning strike was not dense, then my hit ratio would have reduced.
  • It took me about 45 minutes to get 7 usable frames
  • I cropped and edited the pics in PhotoShop CS4 Camera RAW editor (contrast and exposure). I applied mild noise reduction using Noiseware professional.


My Results 

Lightning Strike
Lightning Strike
Lightning Strike
Lightning Strike

Note: You can buy triggers which trigger your camera when lightning strikes. It can make your life a lot simpler!