Wednesday, March 31, 2010

The Pot Sellers – A story in pictures

On my way to office every day, I see everyday these pot sellers selling pots on the roadside. I am as fascinated by the the colorful pots as wither arrangements. Every evening I would vow that I will comeback during the weekend to shoot them and promptly forget or was so lazy that I didn't move out of my house.

Last weekend I decided, that come what may, I will go and shoot them. The sight is too beautiful to miss even for a lazy person like me.

I loath getting out of the house early in the mornings (although I know its the best time for photography). So by the time I was at the Pot Sellers, it was 1PM in the afternoon. And the afternoon sun in India means directly above head casting darkest shadows. Yes, I knew, if I didn't go that day then I would not go ever, I am that lazy!

I packed my gear – a simple one – E-30 with 14-54. Why 14-54? and not 12-60 for instance? No reason what-so-ever. I just felt like taking 14-54 although 12-60 is my favored! :-)

I had the circular polarizer on as well, in order to mellow the harsh sun. I thought of taking Cokin ND GRAD filters. But I didn't want myself to be bogged with trying to change filters at Pot Seller’s place when there may be customers around. Also I knew that I wont be shooting too many bright sky shots.

So I was all set with the gear.

We first went to this place.  I loved the beautiful patterns and the colors depicted.

Nice Patterns

I loved this one!

This was owned by one Dilip Kumar (below). A native from a small village in Bihar, he and his brother are work fulltime as wandering pot sellers. They go from city to city to sell pots. Sometimes they settle down in one place, like he has done.

He came across as all-savvy personality but with a sense of humility. He did not have the arrogance or the boneheaded-ness  about him! He told me he worked in a MNC software company where he worked on computer. His was counting vehicles and creating a report in and out of the company. He was very proud of his new job!

And when he is away on his real-world job, his brother looks after the pot-selling business.

The Pot Seller - Dilip Kumar

He was also quite knowledgeable in photography terms. When I was shooting in the sun, he asked me to shoot in the shade. He said the photos will come out good! He also told me to come back again in the evening when the light is better! I was amazed by his knowledge. So I asked him how come he know so many things about photography. He said another person from a local news paper had come a month earlier and he visited him in the evenings couple of times and this photographer told him about light conditions.

I told him I am too lazy :-)  so I if I don't do it now then I will never do it!

He was also very proud to face the camera and wanted his pictures takes with different backgrounds

Proud business man!

In negotiation with the customer

Just beside Dilip’s store, there was one more pot seller. His name was Deepak (below) and he was from Rajasthan. He gets all his pots from Rajasthan and he also makes statues such as parrots or cows.

Father & Son...

He had a lovely 6 year old who was intrigued by my E-30! And very photogenic too!

And this is Pot Sellers proud son!

These guys sell pots in the range of 100 to 1500 Indian rupees. That is about USD $2 to $35. But the bargaining is heavy. Generally they markup their prices by about 10% to 30% because they know people bargain anyway! and you can reduce the same if you are willing to spend time and negotiate.

Here are some of the most beautiful pots I have seen

Lovely Pots again!

Cool!

The perspective...

Pots on the rack...

Fantastic colors and patterns

Although I keep referring to them as pot sellers, they have wide range of home decor goods made of clay.

Here are the lovely Chimes

Colorful Chimes!

Chimes made of clay

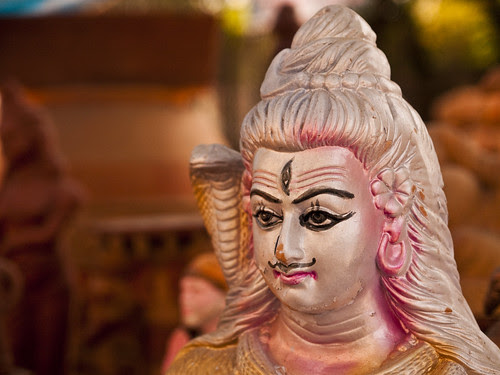
Here are the statues of Gods, god man, parrots cows…you name it!

Clay Statues - SHIVA

He alos sold Statues...

Very Cool Parrots!

This is second shop, he sold colorful statues

They also sold some of the most beautiful lotus flowers….in a clay pot of course!

And the pot seller also sold pots of Lotus!

Beautiful Purple Lotus....


Some technical Info: As I mentioned, it was harsh over head sun.  So I had to take care about the shadows and extreme over and under exposures. How I did it? Its simple

  1. Had Polarizer on – This ensured that the harsh sun is mellowed a bit.
  2. I took care not to have to dark and too bright areas in the same frame. I either shot in shade or in the sun, never mixed the two. This ensured I got perfect exposure across the whole frame.
  3. I used spot metering and did not use EV compensation, because I feel sometime I over do the EV comp. I checked and re-checked my LCD for the exposure. If I felt that exposure is not good enough, I re-shot same picture. I must have shot every picture at least 2 times, some of them 4 or 5 times, before I was happy with the exposure.
  4. I used large aperture, this ensure that even if the shots had over or underexposed areas, it was well out-of-focus.

Simple isn’t it? No Rocket science! :-)

Hope you enjoyed the shoot as much as I did

PS: Kudos to E-30. It was sweltering 43 deg out side and it performed like a breeze!

Cheers!

Tuesday, March 23, 2010

The Bombay Shootout!

I know a title like that will attract attention! I hope it attracts the right kind of attention though :-)

So, Suni, Adu and I toddled along to South Bombay last weekend – and the reason? Well, the goods we shipped from US is finally coming home! So we had to pay a visit to the shipping agents.

And that was an excuse enough to carry my camera, my favored E-P2. Not that I have stopped loving E-30, but as a carry along camera with quality images – E-P2 gives best of pro cameras a good run for their money!

And the lens? Well just the 14-42 (28-84 – 35mm equivalent) kit lens. Nothing flashy, just the bare basic gear – it was a first time for me. I generally carry E-30 with 12-60 and another wide angle and a zoom lens. This time I wanted to travel light. The reason being the heat – its crazy the breeze is cool enough in Bombay, but the humidity and sun kills you and I did not want to be bogged by too many things in my hand.

And I can say I am really glad I made that decision – because I am sure I would not have enjoyed shooting as much as I did with E-P2.

So we left home @ around 9:30 in the morning and the humidity was already oppressive. We took the first class ticket for the local train from Nerul (New Bombay) to VT (Victoria Terminus, now called CST Chattrapati Shivaji Terminus. I, though, prefer to call it by its old name) Station (South Bombay). The journey is about an hour. It being a Saturday, we didn't encounter crowd at all.

Some shots of Nerul Railway station

Nerul Station 

Nerul Station


Nerul Station

TECHNICAL INFO: Before I go further, I want to tell you something. In the morning, just before we left home. I accidentally brushed my finger on the image sensor (actually the filter in front of the image sensor) of E-P2! I was so livid at myself for doing that!. I did it while changing the lens, that goes to show how fragile the micro 4/3rd really is. The short flange distance coupled with absence of mirror really leaves very little room for such accidents. I was glad my finger didnt not press on the sensor too hard or I would have been carrying a very expensive junk. I could see my finger print on the sensor though.

 IMPORTANT ADVICEBe doubly, triply careful when changing lenses on micro 4/3rd bodies, you have very little room for errors!!

Although I could not see any problems in the test images I took soon after, I still wanted the sensor cleaned. And I didn't  have the guts to do it myself (although I have sensor cleaning kit). So I googled to see where the Oly service center was located in South Bombay, and luckily it was very near to the place we were going and had my sensor cleaned at the service center cost me INR 1800 roughly US $40 :-( . But I am glad I got it cleaned, it gave me peace of mind!

I tested my camera inside the Oly service center to see the results and as usual…E-P2 was perfect

Olympus Service Center - South Bombay 

Suni and Adu in Oly Service Center

Now for some real shooting!

Our first visit was to Flora Fountain, as it was near the Oly service center. One of the landmarks of South Bombay. Its cool!

Here is an old building – very typical of South Bombay. I love the old Victorian architecture! (It says Insurance company of Canada!)

An Old Building - South Bombay


Another old Victorian building


The Flora Fountain (unfortunately the fountain was turned off!)

The Fountain - South Bombay

Another shot of the Flora Fountain

The Fountain

A Statue near Flora Fountain. Not sure what it signifies though! Comments welcome!

Statue near Fountain

TECHNICAL INFO: All these photos were taken between 1 and 4 PM when the Sun was over head and intense. So many of the structures were backlit, like in pic above. I used spot metering and it was spot ON!! The ESP and Center weighted were way too underexposed for my liking.

Here is another old Victorian building

An Old Building again - South Bombay

Another typical Bombay view! in front of Flora Fountain

Life in Bombay

Form Flora Fountain we went to VT. On the was we stopped at the old Khadi house. A typical Indian store sells handmade clothing (Khadi). Very Old and very cool! Here is an inside view.

Inside the Khadi House

The interesting tile floor inside the Khadi House.

The Old Khadi House

And we saw street vendors selling vada pav (a regional delicacy)….yummy!!

The Colourful street vendors - South Bombay

Stamp and old currency vendor

Old Stamps, Coins and Currency note vendor

The Transport in Bombay - I still don’t understand how the city manages the kind of growth it has. Simply Amazing!

The Taxi and the Double decker!

This is more than 100 year old building almost in ruins now

Old Building 1908...


Now the VT – The Majestic VT

TECHNICAL INFO: As I mentioned, the lens I had was 14-42mm which in 35mm equivalent is 28-84mm. This by no means is wide-wide, its more a standard-wide zoom lens. So I had difficulty in getting the entire view of the VT Station and I knew this would be the case before hand so I was not disappointed. I would normally have taken a 9-18 (18-36 for 35mm), but I didn't on this occasion because I didn't want too many camera equipments on me. So if you want to capture wide structures then don't forget to take a wide angle lens at least 18mm (35mm format) or better still a Fish eye

I will tell you an amusing story - As I was shooting the gigantic VT Station in various angle, suddenly a car came and parked near me. A guy got out of the car with Nikon D300 and the biggest bazooka lens attached to it, it must be at least 70-300 (APS-C). And he started trying to shoot with the same angle as I was shooting and was clearly exasperated by his efforts! :-) Finally I finished and moved on as I couldn’t stand his predicament!.

The reason why I told you this story is this – You need to understand photography before you start buying the gear. “The bigger the better” mindset completely fails in photography if you don't know what you are doing. And you will only be burning your money on something you don’t know how to use. Hardware cannot replace or supplement your skills.

VT – Views

Another View - VT station


Another Wide View


VT again

The Dome was undergoing maintenance, which was a shame really!

 Wide Angle VT

More angles

Majestic VT

Road in front VT Station

The Majestic BMC (Bombay Municipal Corporation), right in front of VT Station

BMC

The monument for the Martyrs of 1857 freedom movement.

Monument for 1857 freedon fighters


And finally the Bombay Local train! The Ever Reliable!!!

The Mode of transport...Bombay Locals


You can also catch the Slide show here of the complete set

Saturday, March 6, 2010

Evening and Night shots – My Experiments

I thought of writing this after I recently did a very brief photo-shoot from my 4th floor balcony one evening.

I was just fooling around with my camera when Suni pointed that there is a beautiful sunset outside. I had 12-60mm on camera and grabbed my 50-200mm (100-400mm 35 mm equivalent)  as well,  just in case. In the hindsight, it was a good decision!

This photo-shoot was also unique in the sense that this was the first time I experimented using full manual exposure mode.

This is one of the shots I took with 50-200. Before I took this one, I had taken a few more shots with in Aperture Priority Mode and matrix and center-weighted metering. I felt that that the camera was underexposing by at least 2 stops when I used Aperture priority with either of the metering modes. So I then put my camera in Spot metering mode and took the reading (shot couple of test shots) with direct focus on the sun. I found that the exposure was better, but I still felt that there was at least half a stop or 1 stop of under exposure. So I put the camera in manual mode and adjusted the aperture and shutter so that I compensated for half stop under exposure.

Here are the result. I think E-30 did the rest. I felt these are amazing result. I kept the white-balance in AUTO. The red of the sun is as perfect as I was looking at it with naked eye.

Evening and Night Shots

I also took few shots in various angles so that I can crop them as I want them to be. Here are the results. The wide ones are taken with 12-60mm. But the method used to arrive at the manual exposure values is same.

Evening and Night Shots


Evening and Night Shots


I then waited for sun to go down and shot the hill which looked hazy and surreal. I converted these into monochrome in Photoshop and added more grain [the noise on E-30 @ ISO200 is zero unfortunately! ;-)] to get the effect. I love the layered effect I got. These were shot in both aperture priority and manual mode and as you can see, there is some difference in the exposure values, however that is more due to the darkness falling rapidly than anything else. I could as well have shot these in A-priority. But for Sun in the picture, I needed to full manual control.

Evening and Night Shots


Evening and Night Shots


In the same vein, I tried this shot of the crescent moon with the buildings. I struggled a lot to get the exposure right. The moon was going behind the clouds rapidly, and I got this shot just in the nick of time.

Evening and Night Shots

Moreover this was 50-200mm handheld. I rested the barrel of the lens on the barrier of my balcony and hand held with IS-1 on and Live View On. I set the exposure manually based on the experiments in A-Priority mode.

These are just some of my experiments….Hope you enjoyed them.


CIAO!